
Deadband in pressure switches is the gap between the pressure that trips a switch and the pressure that resets it. Get it wrong and you get contact chatter, premature failure, or a process that never settles down.
What Is Deadband in Pressure Switches?
A pressure switch does not trip and reset at the same pressure. Deadband is the built-in gap between those two points, and it is not optional. Every pressure switch has one, whether you asked for it or not.
A pressure switch is really two things joined together, a sensing element and an electrical switch. The sensing element, a diaphragm, Bourdon tube, piston, or solid-state sensor, moves in response to process pressure. Once that movement reaches a preset point called the set point, the electrical contact opens or closes.

That set point can be fixed at the factory or made adjustable. Choosing a switch with a set point in the right operating range matters just as much for accuracy as it does for how long the switch lasts.
Deadband in pressure switches is the difference between the pressure at which the switch trips and the pressure at which it re-actuates on the way back. Without that gap, a pressure sitting right at the set point would make the contact chatter open and closed continuously. That chatter wears out the switch in days rather than years.
You can read more about the physical sensing elements behind these switches in our guide on hammer effect in pressure gauges, since many pressure switches share the same Bourdon tube and diaphragm technology.
This guide covers exactly how deadband in pressure switches is calculated, why it varies so much between switch types, and five factors that trip up even experienced technicians during calibration.
If your process pressure is prone to transients, it is also worth reading how the Joukowsky equation explains sudden surge pressure that can throw off a freshly calibrated switch.
How to Calculate Deadband in Pressure Switches
Calculating deadband is a simple field procedure, but skipping a step early on invalidates every reading that follows.
Verify NC or NO Contacts
Use an ohmmeter or digital multimeter to confirm whether the switch is actually wired Normally Open or Normally Closed before touching any pressure.
Raise Pressure to Trip Point
Slowly increase pressure until the contacts reverse. Record this as the rising, or increasing, set point.
Lower Pressure to Reset Point
From above the trip point, slowly reduce pressure until the contacts reverse back. Record this as the falling, or decreasing, set point.
Subtract for Deadband
Deadband equals the rising set point minus the falling set point. Repeat the whole test once more to confirm repeatability.
Pressure Switch Types and Their Deadband Behavior
Deadband is not a single fixed number. It depends heavily on the sensing element inside the switch, and each type carries its own accuracy and pressure range as well.
Diaphragm Switches
Activated by a weld-sealed metal diaphragm, with a narrow, predictable deadband.
Bourdon Tube Switches
Use a weld-sealed Bourdon tube for actuation, also with a narrow deadband.
Diaphragm Piston Switches
An elastomeric diaphragm acts on a piston, which then actuates the switch.
Piston Switches
A piston directly activates the switch. Deadband here runs noticeably wider than diaphragm types.
Differential Pressure Switches
Two pressure ports, one high and one low, with the sensor responding only to the difference between them.
Solid-State Switches
Digital sensing with programmable outputs, deadband adjustable across the entire range, and PLC connectivity.
Real Pressure Switch Example: Fixed Deadband
Seeing a real switch model with real numbers makes the deadband concept much less abstract.
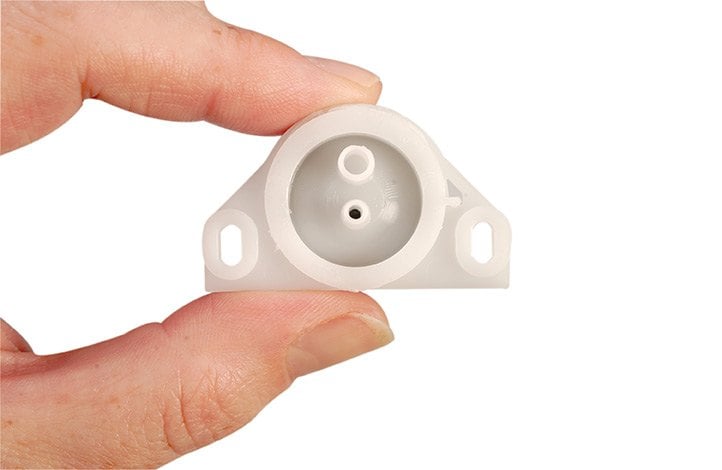
What is happening: This is a high sensitivity, single pole electromechanical switch built for clean, dry, non-corrosive gas service, usable as either a vacuum or differential pressure switch.
A real example: Set point accuracy on this switch is rated at ±10% at 70°F, with a proof pressure of 8 psig. Its adjustable sibling models carry a deadband specified at 15 to 25% of the set point, a real range you would actually see stamped on a data sheet.
Why it works: Because the deadband is built into the mechanical tolerances of the diaphragm and switch mechanism, it stays consistent test after test, which is exactly what makes fixed deadband switches so easy to trust once calibrated.
Real Pressure Switch Example: Adjustable Deadband
Solid-state switches take a completely different approach to the same deadband concept.
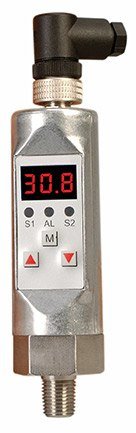
What is happening: This digital pressure switch uses a solid-state sensor, a fully configurable keypad, a 3 digit LED display, and a 10 bit analog to digital converter, with two outputs configurable as either two switches or one switch plus one analog output.
A real example: Accuracy on this unit is rated at 0.5% of full scale with repeatability of ±0.1%, and the deadband itself is adjustable anywhere from 0 to 125% of full scale, entered directly through the keypad rather than set by a mechanical spring.
Why it works: Because the deadband is a number stored in memory rather than a physical spring tolerance, it can be tuned precisely for the application, then changed again later without replacing any hardware.
The Deadband Formula and a Worked Example
Written as a formula, deadband calculation could not be simpler. The complexity is entirely in doing the field procedure correctly.
Deadband = Rising Set Point − Falling Reset Point
Worked example: rising set point = 60 psi, falling reset point = 50 psi
Deadband = 60 − 50 = 10 psi
Deadband as a percentage of set point = 10 / 60 = 16.7%
That percentage matters more than the raw number. Most mechanical pressure switches carry a manufacturer-specified deadband somewhere in the 10 to 30% of set point range. A calculated deadband that falls well outside that window, in either direction, is a sign something needs attention before the switch goes back into service.
Fixed vs Adjustable Deadband Across Switch Types
Not every switch lets you change its deadband, and that is by design, not a limitation. Click each tab to compare.
Bourdon tube and diaphragm switches typically carry a narrow, fixed deadband determined by the mechanical rigidity of the sensing element and the internal spring. These are the switches you calibrate but do not usually tune.
Piston switches naturally carry a wider deadband than diaphragm types, since more physical travel is needed to actuate the switch mechanism. This wider gap is normal, not a defect, and should be expected at commissioning.
Solid-state pressure switches can have their deadband adjusted across their entire operating range, often through a keypad or software interface, making them the most flexible option when process conditions change frequently.
Differential pressure switches respond only to the difference between two ports, so their deadband must be verified against the differential value itself, not against either individual port pressure in isolation.
Pressure Switch Types Comparison Table
| Switch Type | Operating Pressure | Accuracy | Deadband Behavior |
|---|---|---|---|
| Diaphragm | Up to 150 psi | ±0.5% | Narrow, fixed |
| Bourdon Tube | 50 to 18,000 psi | ±0.5% | Narrow, fixed |
| Diaphragm Piston | Vacuum to 1600 psi | ±0.2% | Moderate, fixed |
| Piston | Up to 12,000 psi | ±0.2% | Wide, fixed |
| Solid-State | Broad range, model dependent | ±0.25% | Fully adjustable, 0 to 100%+ of range |
Applications for Deadband-Critical Pressure Switches
These six applications show up again and again where deadband in pressure switches directly affects equipment life and process stability.
Press and Injection Molding Machines
Tight process cycles depend on a well-tuned deadband to avoid false triggers.
Welding Machine Control
Hydraulic and pneumatic pressure switches sequence clamp and weld cycles.
Truck Air Bellows and Rail Brakes
Deadband prevents rapid cycling of air suspension and braking systems.
Automotive Oil and Transmission
Engine oil, power steering, and transmission pressure switches use narrow deadbands for early warning.
Medical Oxygen Delivery
Oxygen delivery systems monitor incoming gas pressure with tightly controlled switching.
Explosion-Proof Oil and Gas Service
Heavy explosion-proof housings protect switches in flammable atmospheres.
5 Hidden Deadband Factors Most Technicians Get Wrong
These five factors about deadband in pressure switches come up again and again in the field, often only discovered after a switch has already failed early or an alarm has chattered for weeks.
Deadband Is Not the Same as Accuracy
Accuracy describes how close a reading is to the true pressure. Deadband describes the gap between trip and reset. A switch can be highly accurate and still have a wide deadband, or the reverse. Mixing the two up leads to chasing the wrong spec on a data sheet.
Switch Construction Sets the Natural Deadband Range
Expecting a piston switch to match a diaphragm switch's tight deadband is unrealistic. The mechanical travel needed to actuate a piston naturally produces a wider gap, and no amount of calibration changes that physical reality.
Skipping NC/NO Verification Invalidates the Test
If you assume the contact configuration instead of measuring it first, every pressure reading you record afterward can be attributed to the wrong transition, silently corrupting the whole calibration.
Too Tight a Deadband Causes Rapid Cycling
Shrinking the deadband to chase tighter control sounds appealing, but a gap that is too narrow lets normal process noise repeatedly cross both trip points, driving contact chatter and premature wear.
Too Wide a Deadband Lets the Process Drift
The opposite mistake is just as common. An overly wide deadband, set to protect the contacts, can let pressure swing far past where an operator actually wants control, undermining the whole point of the switch.
Precision vs Longevity: The Deadband Trade-Off
Operating in the Upper Quarter of Range
Operating in the Lower End of Range
The practical compromise most plants land on is mid-range operation, balancing both concerns rather than maximizing either one. As process conditions shift over the life of a plant, the switch points may need revisiting to keep that balance intact.
Try It: Deadband Calculator
Enter your rising and falling set points to calculate deadband instantly, along with a check against the typical 10 to 30% mechanical switch range.
Download Deadband Calibration References
These two resources go deeper into official deadband adjustment procedures and calibration best practices.
A Comprehensive Guide to Calibrating Pressure Switches
Additel white paper focused specifically on dead band optimization
Ashcroft D400 & D700 Series Installation Manual
Official manufacturer deadband adjustment procedure for real switch hardware
Watch: Pressure Switch Calibration Instructions
This official manufacturer video walks through calibrating set point and deadband on a real mechanical pressure switch.
FAQs on Deadband in Pressure Switches
External References
- Additel, A Comprehensive Guide to Calibrating Pressure Switches with a Focus on Dead Band Optimization
- Ashcroft, D400 & D700 Series Installation and Maintenance Instructions
- DwyerOmega, Understanding Deadband for Pressure Switches
- Tameson, Understanding the Deadband of a Pressure Switch
- YouTube, Ashcroft 400 and 700 B Series Pressure Switch Calibration Instructions
What we learn today
- Deadband in pressure switches is the gap between the rising trip point and the falling reset point, calculated by simple subtraction.
- Every switch type has a different natural deadband, from narrow diaphragm and Bourdon tube switches to wide piston switches to fully adjustable solid-state models.
- Most mechanical pressure switches specify a deadband of 10 to 30% of the set point.
- Deadband is not the same thing as accuracy, and confusing the two is one of the most common field mistakes.
- The best long-term compromise between precision and switch longevity is usually mid-range operation.