Table of Contents
ToggleCorrection Factor in Calibration: Introduction
Have you ever faced below situation during calibration?
You are reviewing a calibration certificate and suddenly realize that the exact correction factor you need is not clearly mentioned.
What do you do next?
Or maybe your instrument is showing errors, but the bigger problem is, it cannot be adjusted. No zero correction, no span adjustment… nothing.
Now how will you improve your measurement accuracy?
This is where a simple concept called Correction Factor is used.
Instead of changing the instrument, you adjust the measured value itself and that small adjustment can bring your readings much closer to the true value.
For anyone working in calibration or instrumentation, knowing how to apply a correction factor is not just useful but it is a must-have skill.
It helps you correctly interpret calibration certificates and ensures better accuracy in real applications.
What You Will Learn in This Article
In this article, we will cover the concept of correction factor in a simple and practical way:
1. What is a Correction Factor in Calibration?
Understand the basic definition and concept in easy terms.
2. Why Correction Factors are Important in Measurements
Learn how they help improve accuracy and reduce errors.
3. 4 Practical Ways to Apply Correction Factors
Including: Direct use of correction value, Nearest correction value method, Averaging method and Linear interpolation method
4. Real Example of Applying a Correction Factor
See how it is used in actual calibration results.
What is a Correction Factor in Calibration?
You must agree the truth “no measurement is perfect”.
Every instrument, no matter how accurate, will always have some level of error. That is exactly why calibration is performed to identify these errors and correct them.
According to VIM, a correction is defined as “compensation for an estimated systematic effect.” In simple terms, it means adjusting your measured value to reduce a known error.
A Correction Factor (CF) is the value we add or subtract from a measured reading to bring it closer to the true value. It is calculated from calibration results using the relation:
Correction=True Value−Measured Value
This correction value helps compensate for systematic errors. However, it’s important to remember that even correction factors are not perfect they are still estimates, because measurement uncertainty always exists.
In practice, applying a correction factor is one of the simplest and most effective ways to improve measurement accuracy, especially when the instrument cannot be physically adjusted. It is also commonly referred to as calibration correction or corrective factor in industry.
Why Do We Need to Calculate a Correction Factor?
Calibration helps us find errors in measurements but finding the error is not enough. We also need to correct it.
If an instrument cannot be adjusted physically, the only way to improve accuracy is by using a correction-factor. Without applying it, the calibration result has no real use in actual measurement.
In simple terms, if you don’t know the correction, you cannot improve the reading.
Another important reason is compliance. As per ISO 17025:2017, correction factors must be updated and applied after every calibration to ensure accurate and reliable results.
So, using the correct correction factor helps you:
1. Get more accurate measurements
2. Properly use calibration results
3. Meet standard requirements
That’s why learning how to apply correction factors is essential in calibration work.
4 Ways to Apply Correction Factors in a Calibration Certificate
Once you understand what a correction-factor is, the next step is knowing how to apply it in real situations. In practice, there are many methods available, but based on experience, these four techniques are the simplest and most commonly used.
1. Direct Application of the Correction Value
In this method, you directly use the correction value provided in the calibration certificate. This is the easiest and most straightforward approach.
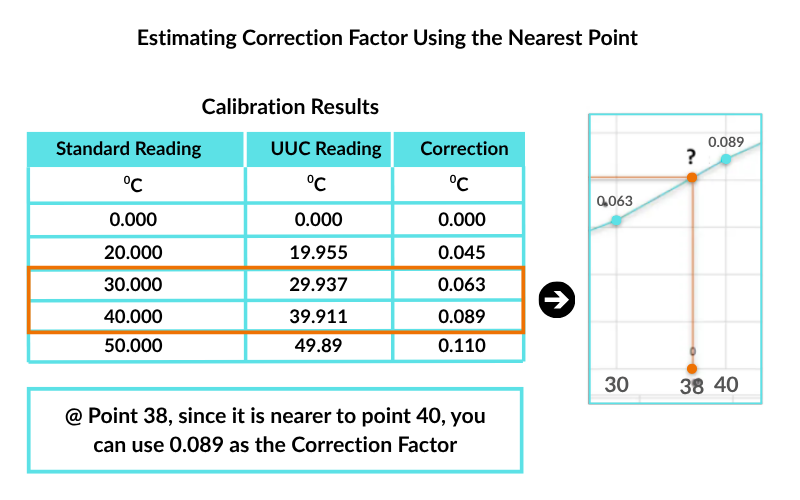
2. Using the Nearest Correction Value
If the exact value is not available, you can use the closest correction value from the certificate. This method works well when the difference is very small.
3. Averaging Between Two Correction Factors
When your required value lies between two points, you can take the average of those two correction factors to estimate the result.
4. Linear Interpolation Method
This method is used when you need a more accurate correction factor between two known values. It gives a better estimate compared to simple averaging.
1. Direct Application of the Correction Value

Sample calibration result showing the values of calculated “correction”
The Correction Factor formula for calibration is:
Correction = (True Value) – (Measured Value)
Correction = Correction Factor (CF)
CF = – Error
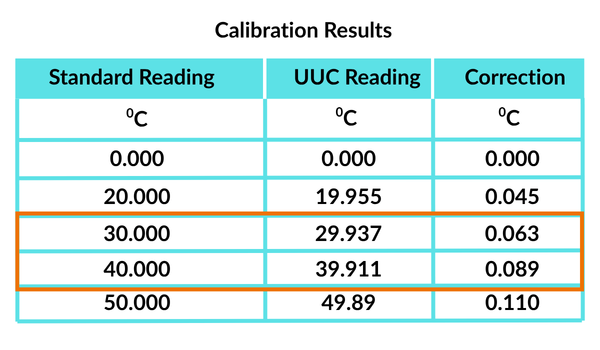
Example above @20 °C range:
Correction = 20.000 – 19.955 = 0.045 °C
CF = 0.045 °C
2. Using the Nearest Reported Correction Value in the Certificate
This method is a simple to find the correction factor.
You can use it when small differences don’t really affect the final result. This usually happens when the tolerance is wide or the instrument has low resolution. In such cases, this method gives a quick estimate of the correction factor.
If your measured value is not exactly in the middle but closer to either the upper or lower range, just select the value it is closest to.
See the example below.
How can you find the correction factor when the exact value is not available? Or how can you adjust it to get the exact value you need?
To understand this, let’s look at the next two simple techniques explained below.
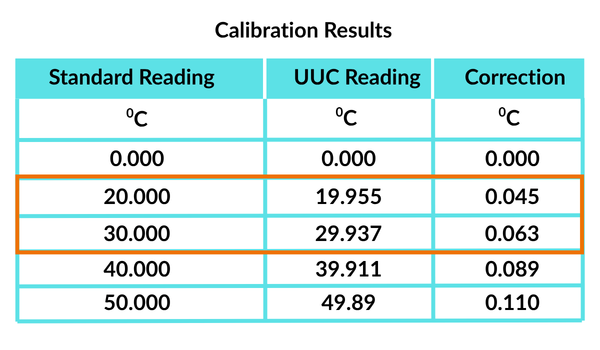
3. Averaging Between 2 Correction Factors
If you want to find the correction factor between two nearby values, you can use the Averaging Method.
In this method, simply add the two values and divide the result by 2. This gives you a quick and reasonable estimate of the correction factor.
See the example below using the same data points.
To find the correction-factor (CF) at a standard reading of 25, we use the averaging method:
1. Take the two closest values:
CF at 20 = 0.045
CF at 30 = 0.063
2. Add them together and divide by 2
Result:
The estimated correction-factor at 25 = 0.054
This method works well because 25 lies exactly between 20 and 30, so the average gives a quick and reliable estimate.
4. Using Linear Interpolation to Determine Any Value Between 2 Points
If only two points are given (maximum and minimum) along with their correction values, and the values change steadily (either increasing or decreasing), you can use Linear Interpolation.
This method helps you find any value that lies between these two points.
Linear interpolation is best used when you need a more accurate value anywhere within a known range defined by the minimum and maximum points.
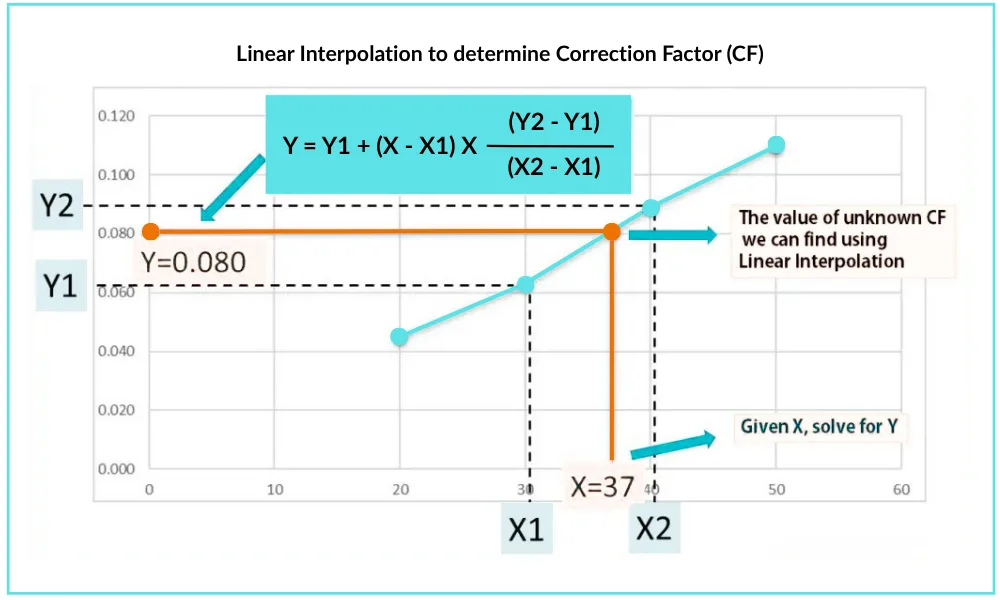
The equation for a linear Interpolation is:
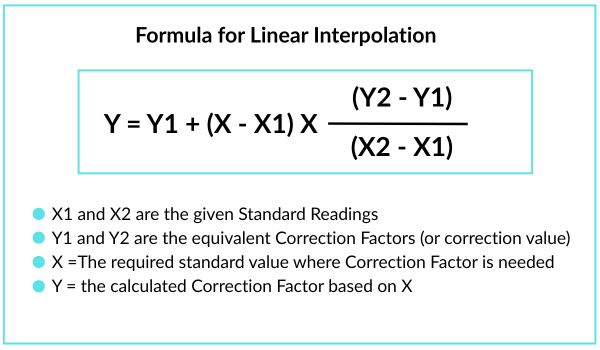
Let us take an example here. Determine the Correction-factor @ point 37 in the table below (You can refer to the graph above):
Solution:
Y1 = 0.063
Y2 = 0.089
X1 = 30
X2 = 40
X = 37
Y = 0.063 + (37 – 30) X [ (0.089 – 0.063) / (40 – 30) ]
Y = 0.0812
Correction Factor @37 Deg C = 0.0812 Deg C
Example of How to Apply the Correction-Factor
Given below calibration results of a balance: (Example only) – Units Grams
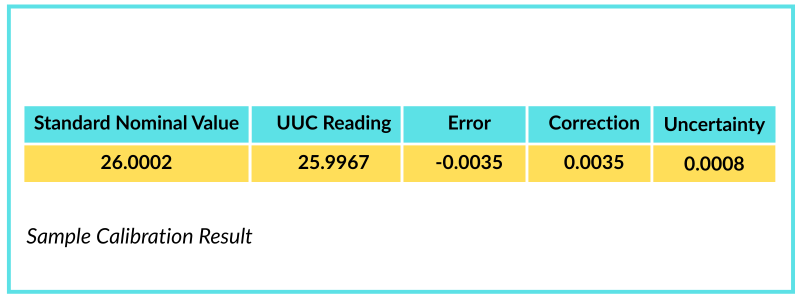
While reviewing the calibration results, you may notice that the balance is not adjusted, but a correction value is provided (see table above).
In such cases, before using the actual reading from the balance, you should apply this correction value. This correction value acts as a correction-factor, helping to compensate for the measurement error and giving you a more accurate result.
Final UUC Reading = Actual Value + CF (Substract if Negative)
= 25.9967 + 0.0035
= 26.0002
The “Final UUC Reading” will become now your final value to be applied during your measurement process.
So, the error is compensated (ERROR = 0), and the measured value becomes equal to the standard value. As a result, the accuracy is improved.
Remember, the correction factor is obtained during calibration and is used to offset the error. That’s why it should be either added to or subtracted from the final reading of the instrument (UUC).
Correction factors are especially used for instruments that cannot be adjusted. In such cases, we calculate and apply the correction factor manually to get accurate results.
What we learn today?
One of the most important skills in using calibration results is understanding how to calculate and apply correction factors. This helps you get more accurate measurements and better appreciate the value of calibration.
A correction factor improves accuracy by simply compensating for the error in measurement.
It is also called a calibration correction or corrective factor. The correction factor comes from the calculated “correction,” which is basically the opposite of the “error.”


I hope you like above blog. There is no cost associated in sharing the article in your social media. Thanks for Reading !! Happy Learning