Table of Contents
ToggleHydrotest Procedure: Introduction
Hydrotest, also called a hydrostatic test, is an important step in both the construction and maintenance of piping systems.
Before any new piping system is put into operation, it is necessary to check whether it has been installed correctly and is safe to use.
The Hydrotest Procedure helps confirm that the system is ready for service. Even after installation, piping systems need regular checking during shutdown or maintenance periods so that any possible leakage or failure can be identified early.
In process industries, where pipes and vessels often operate under high pressure, hydrotesting ensures that weld joints, flange connections, and materials are strong enough to handle the pressure without leakage.
This simple but essential test helps improve safety, reliability, and long-term performance of the entire piping system.
Also read our article : Hydrostatic Testing in Oil and Gas Industry.
Why Perform a Hydrotest?
The Hydrotest Procedure is carried out to ensure that a piping system is safe, strong, and ready for operation. New piping systems are tested before commissioning, while existing systems may be re-tested during maintenance or after modifications.
1. To check system integrity – ensures the piping is structurally sound.
2. To ensure leak-tightness – verifies there are no leaks under pressure.
3. To check welds and materials – confirms strength of joints and piping material.
4. To inspect flange connections – ensures proper fitting and sealing.
5. To ensure safe and smooth operation – reduces chances of failure during use.
In simple terms, hydrotesting helps confirm that the piping system can handle pressure safely without any risk.
Types of Pressure Test
In industry, there are mainly two types of pressure tests used to check piping systems:
1. Hydrostatic Test (Hydrotest)
This test is carried out using water as the testing medium. It is the most commonly used method because it is safer and easier to control.
2. Pneumatic Test
This test is performed using air, nitrogen, or other non-flammable gases. It is generally used when water cannot be used, but it requires extra safety precautions.
Hydrotest Pressure
In the Hydrotest Procedure, the test pressure is always kept higher than the design or operating pressure of the piping system. This ensures that if the system can safely withstand this higher pressure during testing, it will perform reliably under normal working conditions without failure.
Apparatus Used for Hydrotest
The following equipment is commonly used during a hydrotest:
Pump
Used to generate and increase pressure inside the piping system.
Hose and Fittings
Help in connecting the pump with the piping system and other test equipment.
Test Medium
Water is most commonly used as the testing medium due to safety and availability.
Pressure Gauge
Measures the internal pressure of the system during testing.
Temperature Gauge
Monitors temperature to ensure it stays within allowable limits.
Torch/Flashlight
Used for visual inspection to detect any leakage.
Torque Wrench
Ensures proper tightening of bolts and joints.
Supports
Provide stability and hold the piping or vessel in position during the test.

Note: Pressure gauges should be calibrated within one year, and their range should be between 1.5 to 4 times the hydrotest pressure for accurate and safe measurement.
Water Selection Criteria for Hydrotest
In the Hydrotest Procedure, the quality of water used is very important. Using untreated water from lakes or ponds can damage the piping system over time. Even if corrosion is not visible immediately, repeated use of contaminated water can lead to internal corrosion and leakage in the future.
That’s why clean and treated water should always be used. In most cases, the water should be as close as possible to drinking (potable) water quality.
Below are the general recommended parameters:
1. pH Value – should be between 7 to 8.5
2. Water Hardness – typically between 150 to 400 ppm
3. Calcium (Ca) – should not exceed 80 ppm
4. Magnesium (Mg) – should be below 40 ppm
5. Iron Content (Fe) – should be within 0.3 ppm
6. Turbidity – acceptable up to 10–20 ppm
7. Total Suspended Solids (TSS) – should be nil
8. Temperature – should not be less than 17°C
In simple terms, the water used for hydrotesting should be clean, low in impurities, and similar to potable water. Most companies follow their own checklist to ensure these parameters are met before testing.
Water Volume Calculation
Now we will learn how to calculate the required water volume for testing. Please use below formula.

Where,
V = Gallons required to fill at 0 psig
L = Length of the test section (in feet)
d = Diameter of pipe, inches (in inch)
You can input the required required parameters in the formula to get required water volume.
Testing Pressure Table for Different Systems

MAWP: Maximum Allowable Working Pressure
NFPA: National Fire Protection Association
The above values are based on commonly accepted industry standards and practices.
Calculate Test Pressure
The test pressure can also be calculated using the formula below :

Where,
Pt = Minimum hydro-test pressure
P = Internal design pressure
St = Allowable stress at the test temperature
S = Allowable stress at design temperature
Note: the ratio of St/S should not exceed 6.5
(For getting the value of S & St, See Table A-1, Appendix A, ASME B31.3)
Preparation Prior to Hydrotest
Before starting the Hydrotest Procedure, proper preparation is very important to ensure accurate results and safety.
1. Flush the System
Clean the piping system using a flushing process to remove dirt, debris, and foreign particles.
2. Ensure Water Availability
Confirm that sufficient and suitable test water is available as per requirements.
3. Check Welding Completion
All welding work should be completed and approved by the NDT inspector.
4. Clean Internal Surfaces
Make sure the inside of pipes or vessels is free from slag, dust, or solid particles.
5. Keep External Surface Dry
A dry outer surface helps in easy visual inspection for leak detection.
6. Verify Pressure Gauge Calibration
Ensure gauges are calibrated and their range is 1.5 to 4 times the test pressure.
7. Check Temperature Limit
Test temperature should not exceed 48°C.
8. Inspect Reinforcement Pads
Nozzle reinforcement pads should be pre-tested at the workshop.
9. Ensure Proper Draining
Confirm that all lines can be easily drained after the test.
10. Provide Vent at High Points
Keep vents open at high points to release trapped air during filling.
11. Keep Joints Visible
All joints should be exposed (not insulated) for proper inspection.
12. Isolate Non-Test Sections
Separate equipment or lines not included in testing using blinds or spectacle blinds.
13. Support Expansion Joints Properly
Use temporary restraints for expansion joints or spring supports to prevent damage during testing.
Proper preparation ensures that the hydrotest is carried out safely, efficiently, and without errors.
Hydrotest Procedure – Step-by-Step
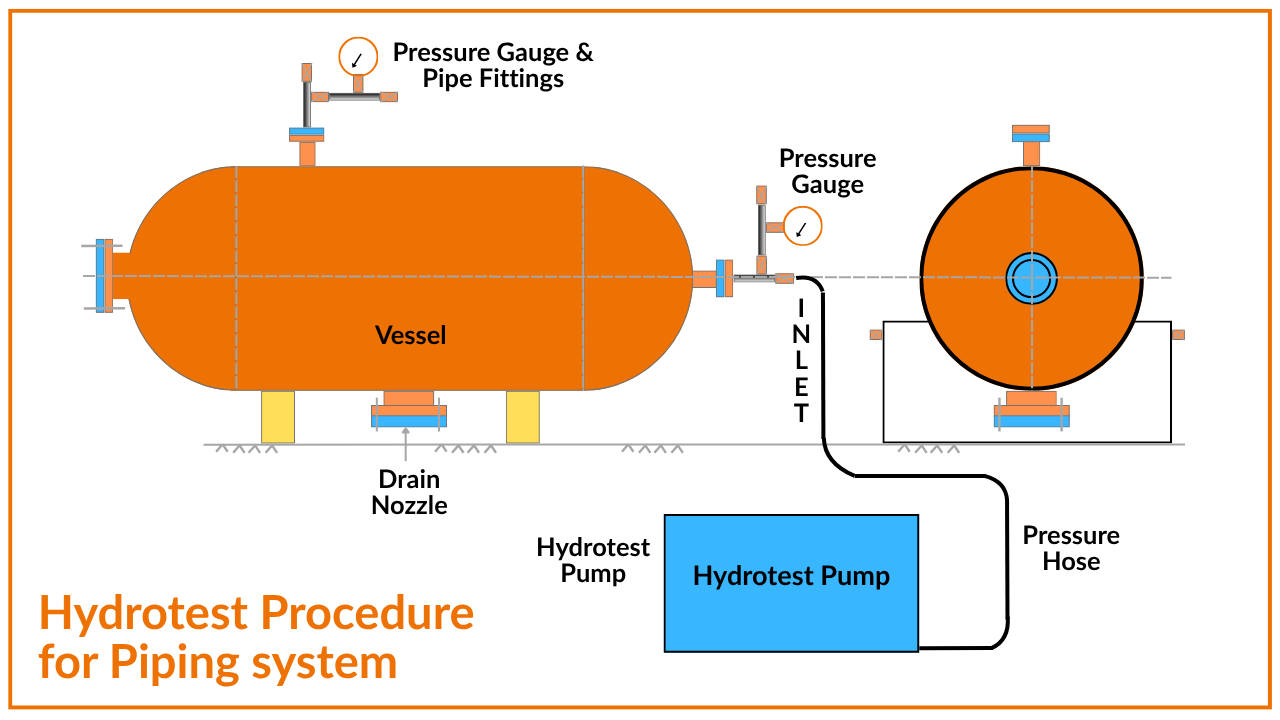
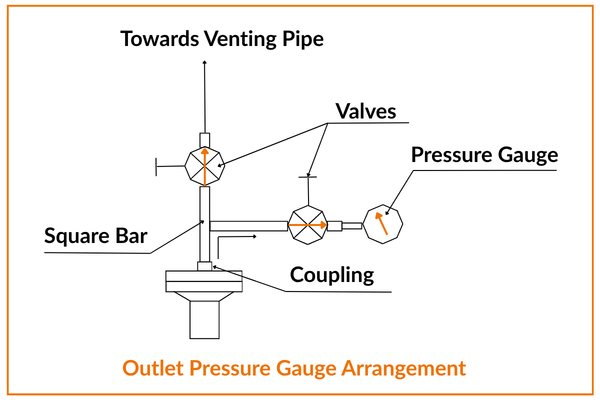
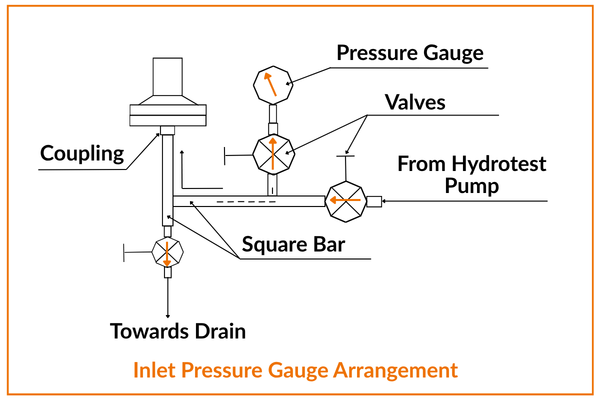
Step 1: Install Testing Setup
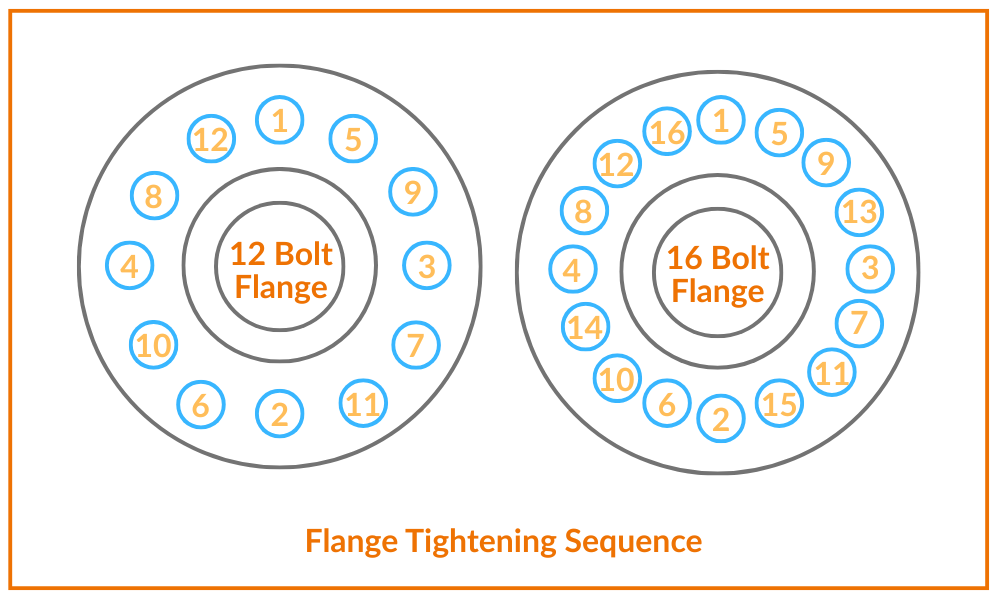
Set up all testing equipment and tighten nozzles, manways, handways, and flange joints with the correct torque. Please refer above figure for reference.
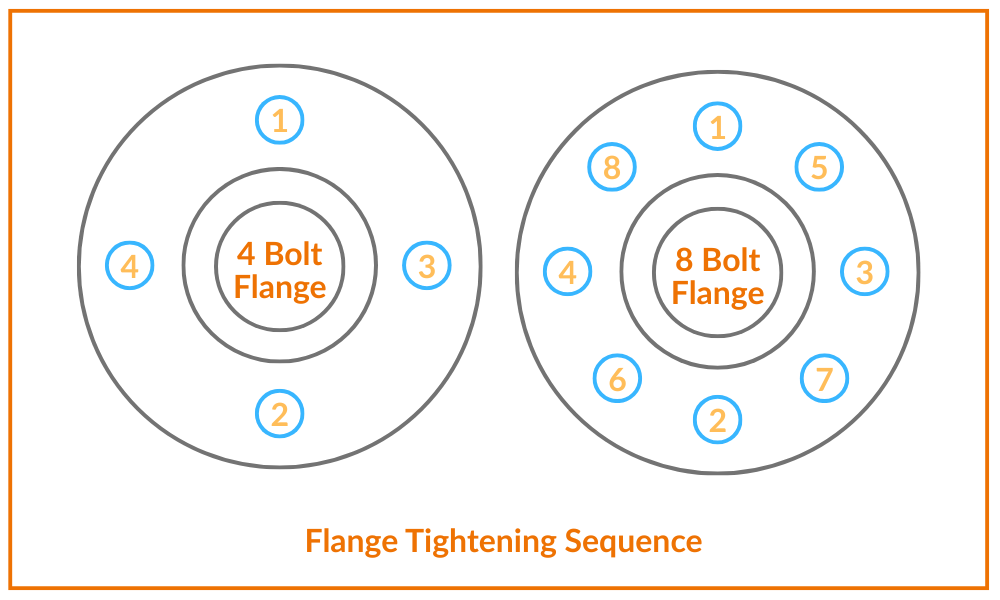
Step 2: Follow Proper Tightening Sequence
Ensure flange bolts are tightened in the correct sequence for uniform sealing.
Step 3: Fill the System with Water
Start filling water after confirming vents are open and water quality meets requirements.
Step 4: Remove Air from System
Allow water to overflow from high-point vents to ensure the system becomes air-free.
Step 5: Confirm No Air Pockets
Close vents gradually and ensure no air bubbles remain inside the piping or vessel.
Step 6: Start Pressurizing
Use a suitable pump to increase pressure. Ensure pump pressure does not exceed the hydrotest pressure.
Step 7: Monitor Pressure Readings
Continuously observe the pressure gauge during the test.
Step 8: Increase Pressure Gradually
Raise pressure slowly up to the test pressure. Keep personnel away from joints during this stage.
Step 9: Hold Test Pressure
Maintain the required pressure (typically 30 minutes). Pressure should remain stable without drop.
Step 10: Inspect for Leaks
Reduce pressure to design level and check all welds and flange joints for leakage. If leaks are found, fix and repeat the test.
Step 11: Depressurize Safely
Release pressure slowly. Open the top vent first, then the drain to avoid vacuum formation.
Following this step-by-step Hydrotest Procedure ensures safe, accurate, and reliable testing of piping systems.
Note: A pressure gauge used for hydrotesting should not be reused without proper calibration, as it may give inaccurate readings.
Important Points to Consider During Hydrotest
1. Install Sensitive Instruments Later
Orifice plates, spray nozzles, and similar components should be installed only after completing the hydrotest.
2. Use Temporary Gaskets if Needed
If dismantling is required, use low-cost gaskets for testing and replace them later with specified PMS gaskets.
3. Fill the System Slowly
Slow filling helps in removing trapped air effectively.
4. Connect Pump at Lowest Point
The testing pump should be connected at the lowest point for better pressure distribution.
5. Ensure Proper Pump Priming
Remove all air from the pump before starting to avoid errors.
6. Prevent Backflow
Isolate the pump from the system to avoid reverse flow during testing.
These points help ensure a safe and accurate Hydrotest Procedure.
FAQs on Hydrotest Procedure
1. What is a hydrotest?
A hydrotest is a pressure test where water is used to check the strength and leak-tightness of a piping system.
2. Why is hydrotest pressure higher than operating pressure?
To ensure the system can safely handle pressure beyond normal conditions without failure.
3. Why is water used instead of air?
Water is safer because it stores less energy compared to air, reducing the risk of accidents.
4. How long is the pressure held during hydrotest?
Typically, the pressure is held for about 30 minutes or as per design specifications.
5. What happens if leakage is found?
The system is depressurized, defects are repaired, and the test is repeated.
6. Can hydrotest be done without removing air?
No, trapped air can give incorrect results and may be dangerous during testing.
Wat we learn today?
The Hydrotest Procedure is a critical step in ensuring the safety, strength, and reliability of piping systems.
By following proper preparation, using the right equipment, and executing each step carefully, industries can prevent leaks, failures, and costly downtime.
Hydrotesting acts as a final safety check before the system is put into operation, ensuring long-term performance and peace of mind.


I hope you like above blog. There is no cost associated in sharing the article in your social media. Thanks for Reading !! Happy Learning