Table of Contents
ToggleIn modern process plants, most smart field instruments use HART communication to send both analog and digital data at the same time.
The 4–20 mA signal carries the measurement value, while the HART digital signal allows technicians to read device information, change settings and diagnose faults without stopping the process.
This digital signal cannot travel properly unless the loop has the right electrical conditions. That is why a HART Loop Resistor is required.
HART Loop Resistor creates the correct voltage level and helps the HART signal move through the loop clearly.
Without this resistor, even if everything looks properly wired, the communicator may fail to connect.
Understanding what a HART Loop Resistor is and how it improves HART communication is very important for every instrumentation engineer and technician working in the field.
Please see below Figure which shows the placement of the Loop Resistor in the loop
and where the modem connections can be made.
What is HART Loop Resistor Value?
The HART standard recommends that the HART Loop Resistor should have a value between 230 ohms and 600 ohms.
In most applications, 250 ohms is used because it gives a very easy conversion from current to voltage. For example:
1) At 4 mA, the voltage drop becomes 1 V
2) At 20 mA, the voltage drop becomes 5 V
This simple conversion is useful in many control systems where voltage measurement is needed for monitoring or diagnostics.
Where to Install the HART Loop Resistor in a Plant?
The loop resistor must always be placed in series with the 4–20 mA loop. But the exact location can vary depending on your control system layout.
Here are the common placement options:
Inside the PLC or Control System I/O Card
Many modern PLC input modules already include a built-in 250-ohm resistor.
Example: Allen-Bradley 1756-IF8 card has an internal loop resistor.
This is the easiest installation method, no additional wiring required.
In the Marshaling Cabinet
If the PLC input does not provide a resistor, the next best location is in the marshaling cabinet. Why this is a good option:
1) The cabinet is easily accessible
2) Wiring junctions are already available
3) No direct disturbance to field instruments
This allows the resistor to be inserted neatly into the loop without interrupting field equipment.
At the HART Field Instrument
This is considered the least preferred option, especially for a running process.
Why?
Because the wiring must be disconnected to insert the resistor in series.
However, some instruments have enough space inside the housing to mount the resistor permanently, making future HART communication easier.
Wherever you place it — just ensure the HART Loop Resistor is always in series with the loop, not parallel
Using a HART Loop Resistor During Bench Testing
When working with HART instruments in a workshop or laboratory setup, you have more flexibility in how the HART Loop Resistor is connected.
The simplest approach is to attach a resistor directly in series with the instrument. Connect one end of the resistor to the device terminal, and then connect the DC power supply between the other resistor terminal and the remaining device terminal.
This creates a proper powered HART loop for testing and configuration.
If you are using a loop calibrator, many models already include a built-in resistor that can be switched on when needed.
For example, the Fluke 789 offers a “loop resistor enable” function, making it easy to power the device and establish HART communication without any external components.
Some modern HART communication modems also provide loop power and include an internal HART resistor.
This allows technicians to power the instrument and communicate with it using only the modem and a smartphone or tablet, a very convenient setup for field diagnostics, commissioning, and maintenance activities.
Why Are Some Loops Working Without a HART Loop Resistor?
It is important to understand that a HART Loop Resistor is always required according to the official HART communication standard. Some loops may still work even without a dedicated resistor.
This usually happens when the loop wiring is very long, and the cable itself adds enough resistance to support the HART signal.
Another reason is the quality of the HART modem. Many modern modems are designed to:
- Detect weaker voltage signals
- Transmit stronger digital signals
Because of this improved sensitivity, communication may still succeed even when the loop resistance is below the recommended value. But there is a downside highly sensitive modems can also pick up electrical noise, which may cause unreliable or unstable communication.
So while communication might work in some cases, it is not guaranteed. For safe, consistent, and standards-based HART performance, a proper HART Loop Resistor should always be installed in the loop.
Common Mistakes When Installing a HART Loop Resistor
Even though using a HART Loop Resistor seems like a simple task, wiring mistakes still happen quite often in the field.
One common mistake is connecting the HART modem in series with the loop instead of connecting it across the resistor.
When the modem is placed in series, the loop becomes broken or unstable, and communication will fail. Your communicator will not be able to detect the HART signal properly.
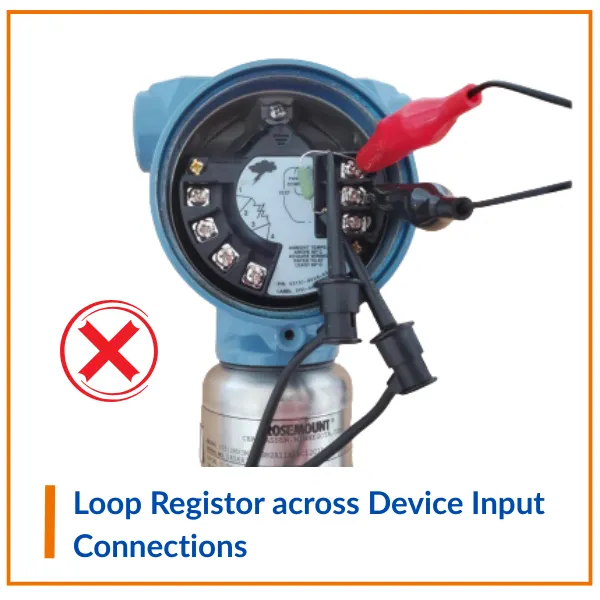
Another frequent mistake is placing the loop resistor across the instrument terminals. When this happens, the resistor bypasses the device completely.
The instrument is no longer part of the loop, and the current becomes fixed, meaning the transmitter cannot send any measurement data. HART communication will again fail.
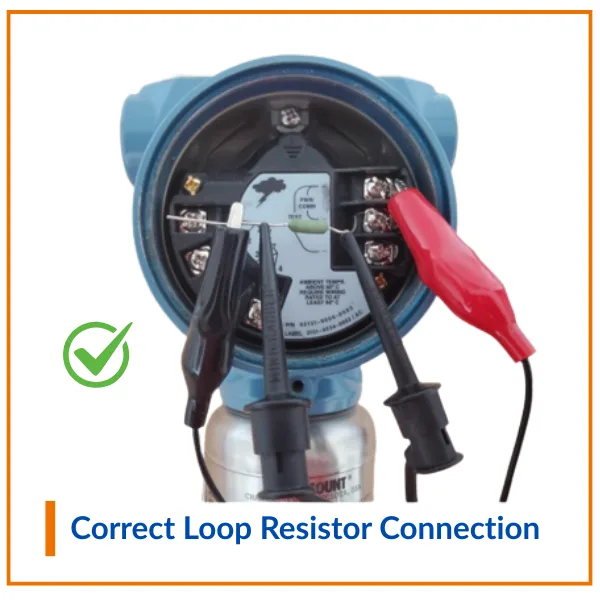
The important rule to always remember is: The loop resistor must be installed in SERIES with the loop power and the instrument
The modem should be connected in parallel, across the resistor or across the instrument terminals (depending on resistor placement)
Correct series installation ensures the proper voltage development required for reliable HART communication and prevents costly troubleshooting later.
Please see below connections for reference.
What we learn today?
A HART Loop Resistor is not just an optional accessory but it is a mandatory requirement for proper HART communication.
Even though some loops may still operate without it, the reliability will suffer. More electrical noise enters the system, communication becomes slow, and retry errors will occur more frequently. This can waste valuable time during instrument configuration and troubleshooting.
The best practice is to always install the loop resistor during the design and installation stage.
If the loop is already in service, it should be added during the next planned shutdown.
By making sure every HART loop has the correct resistor in series, your instrumentation team will enjoy smooth communication and faster diagnostics with fewer frustrations in the field.
I hope you like above blog. There is no cost associated in sharing the article in your social media. Thanks for Reading !! Happy Learning
